Page Contents
HAZARD WARNING FLASHER
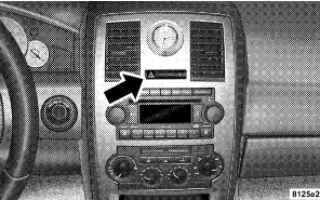
The hazard flasher switch is located in the center of the instrument panel between the center air outlets.

To engage the Hazard Warning Flashers, depress the switch on the instrument panel. When the Hazard Warning is activated, all directional turn signals will flash on and off to warn oncoming traffic of an emergency. Push the switch a second time to turn off the flashers. This is an emergency warning system and it should not be used when the vehicle is in motion. Use it when your vehicle is disabled and it is creating a safety hazard for other motorists. When you must leave the vehicle to seek assistance, the Hazard Warning Flashers will continue to operate even though the ignition switch is OFF. NOTE: With extended use, the Hazard Warning Flashers may wear down your battery.
IF YOUR ENGINE OVERHEATS
In any of the following situations, you can reduce the potential for overheating by taking the appropriate action.
• On the highways — Slow down.
• In city traffic — While stopped, put transmission in neutral, but do not increase engine idle speed.
NOTE: There are steps that you can take to slow down an impending overheat condition. If your air conditioner is on, turn it off. The air conditioning system adds heat to the engine cooling system and turning off the A/C removes this heat. You can also turn the Temperature control to maximum heat, the Mode control to floor, and the fan control to HI. This allows the heater core to act as a supplement to the radiator and aids in removing heat from the engine cooling system.
CAUTION!
Driving with a hot cooling system could damage your vehicle. If temperature gauge reads “H”, pull over and stop the vehicle. Idle the vehicle with the air conditioner turned off until the pointer drops back into the normal range. If the pointer remains on the “H”, turn the engine off immediately, and call for service.
WARNING!
A hot engine cooling system is dangerous. You or others could be badly burned by steam or boiling coolant. You may want to call a service center if your vehicle overheats. If you decide to look under the hood yourself, see Section 7, Maintenance, of this manual. Follow the warnings under the Cooling System Pressure Cap paragraph.
JACKING AND TIRE CHANGING
WARNING!
• Do not attempt to change a tire on the side of the vehicle close to moving traffic. Pull far enough off the road to avoid the danger of being hit when operating the jack or changing the wheel.
• Getting under a jacked-up vehicle is dangerous. The vehicle could slip off the jack and fall on you. You could be crushed. Never get any part of your body under a vehicle that is on a jack. Never start or run the engine while the vehicle is on a jack. If you need to get under a raised vehicle, take it to a service center where it can be raised on a lift.
• The jack is designed to use as a tool for changing tires only. The jack should not be used to lift the vehicle for service purposes. The vehicle should be jacked on a firm level surface only. Avoid ice or slippery areas.
Preparations For Jacking
1. Park the vehicle on a firm level surface as far from the edge of the roadway as possible. Avoid icy or slippery areas.
2. Set the parking brake and place the gear selector in PARK.
3. Turn OFF the ignition. 4. Turn on the Hazard Warning Flasher

5. Passengers should not remain in the vehicle when the vehicle is being jacked.
6. Block both the front and rear of the wheel diagonally opposite the jacking position. For example, if changing the right front tire, block the left rear wheel.
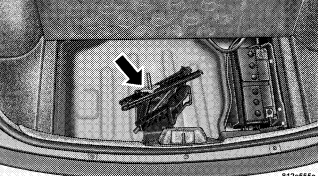
Jack Location/Spare Tire Stowage
The jack and spare tire are both stowed under an access cover in the trunk. Follow these steps to access the jack and spare tire.
NOTE: The spare tire must be removed in order to access the jack.
1. Open the trunk.
2. Lift the access cover using the pull strap.

3. Remove the fastener securing the spare tire.

4. Remove the spare tire.
5. Remove the fastener securing the jack.
WARNING!
A loose tire or jack thrown forward in a collision or hard stop could endanger the occupants of the vehicle. Always stow the jack parts and the spare tire in the places provided.
Jacking and Changing a Tire

- Block the wheel diagonally opposite the flat tire. Passengers should not remain in the vehicle
when the vehicle is being jacked
2. Remove the spare tire, jack, and lug wrench.
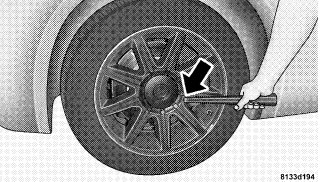
3. If equipped with steel wheels, do not remove the wheel cover at this time. If equipped with aluminum wheels, before raising the vehicle, use the lug wrench to pry the center cap off carefully.
WARNING!
To avoid possible personal injury, handle the wheel covers with care to avoid contact with the metal edges and retention teeth.
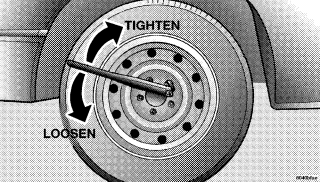
4. Before raising the vehicle, use the lug wrench to loosen, but not remove, the lug nuts on the wheel with the flat tire. Turn the lug nuts counter-clockwise one turn while the wheel is still on the ground.
5. Place the jack underneath the lift area that is closest to the flat tire. Turn the jack screw clockwise to firmly engage the jack saddle with the lift area of the sill flange.

6. Raise the vehicle just enough to remove the flat tire and install the spare tire.
WARNING!
Raising the vehicle higher than necessary can make the vehicle less stable. It could slip off the jack and hurt someone near it. Raise the vehicle only enough to remove the tire.
7. Remove the lug nuts, wheel cover (if equipped), and tire. Remove the cover by hand. Do not pry it off.
8. Mount the spare tire. For vehicles equipped with wheel covers, “Wheel Cover Installation.” Do not attempt to install a wheel cover on a compact spare.
9. Tighten all the lug nuts on the mounting studs.
10. Lower the vehicle to the ground by turning the jack handle counter-clockwise.
11. Fully tighten the lug nuts. Torque the wheel lug nuts to 100 ft/lb. (135 N. m).
12. Store the flat tire, jack, and tools.
WARNING!
A loose tire or jack thrown forward in a collision or hard stop could endanger the occupants of the vehicle. Always stow the jack parts and the spare tire in the places provided.
Compact Spare Tire The compact spare tire is for temporary emergency use with radial tires. It is engineered to be used on your style vehicle only. Since this tire has limited tread life, the original tire should be repaired (or replaced) and reinstalled at the first opportunity.
• Keep tire inflated to 60 PSI (414 KPa) Cold Inflation Pressure.
• Avoid driving more than 50 miles (80 km) before replacing tire and wheel. • This tire is designed as an emergency spare only. Do not exceed 50 MPH (80 km/h) speed.
Wheel Cover Installation (If Required)
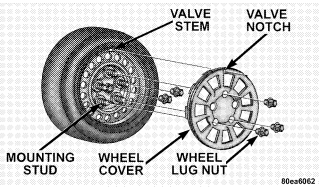
1. Tighten the two lug nuts on the mounting studs on each side of the stud, which is in alignment with the valve stem.
2. Align the valve notch in the wheel cover with the valve stem on the wheel.
3. Install the cover by hand, snapping the cover over the two lug nuts. Do not use a hammer or excessive force to install the cover.
4. Install the remaining lug nuts.
5. Return to Step 9 of the “Jacking and Changing a Tire” procedure.
JUMP-STARTING PROCEDURES
WARNING!
• Take care to avoid the radiator cooling fan whenever the hood is raised. It can start anytime the ignition switch is on. You can be hurt by the fan.
• Do not attempt to push or tow your vehicle to get it started. Vehicles equipped with an automatic transmission cannot be started this way. Unburned fuel could enter the catalytic converter and once the engine has started, ignite and damage the converter and vehicle. If the vehicle has a discharged battery, booster cables may be used to obtain a start from another vehicle. This type of start can be dangerous if done improperly, so follow this procedure carefully.
• Battery fluid is a corrosive acid solution; do not allow battery fluid to contact eyes, skin, or clothing. Don’t lean over battery when attaching clamps or allow the clamps to touch each other. If acid splashes in eyes or on skin, flush contaminated area immediately with large quantities of water.
• A battery generates hydrogen gas, which is flammable and explosive. Keep flame or spark away from the vent holes.
• Do not use a booster battery or any other booster source with an output that exceeds 12 volts.
• The battery in this vehicle has a vent hose that should not be disconnected and should only be replaced with a battery of the same type (vented).
NOTE: The battery is stored under an access cover in the trunk. Remote battery terminals are located in the engine compartment for jump-starting. 1. Wear eye protection and remove any metal jewelry such as watchbands or bracelets that might make an inadvertent electrical contact. 2. When boost is provided by a battery in another vehicle, park that vehicle within booster cable reach, but do not allow the vehicles to touch one another.
WARNING!
Do not permit vehicles to touch each other as this could establish a ground connection and personal injury could result.
3. Set the parking brake, place the automatic transmission in PARK, and turn the ignition switch to the OFF (or LOCK) position on both vehicles.
4. Turn off the heater, radio, and all unnecessary electrical loads.
5. Connect one end of the jumper cable to the remote jump-start positive battery post (+) in the engine compartment. Connect the other end of the same cable to the positive terminal of the booster battery. Refer to the following illustration for jump-starting connections.
6. Connect the other cable, first to the negative terminal of the booster battery and then to the engine ground (-) of the vehicle with the discharged battery. Make sure you have a good contact on the engine ground. Refer to the following illustration for jump-starting connections.

WARNING!
• You should not try to start your vehicle by pushing or towing.
• Do not connect the cable to the negative post of the discharge battery. The resulting electrical spark could cause the battery to explode.
• During cold weather when temperatures are below freezing point, electrolyte in a discharged battery may freeze. Do not attempt jump-starting because the battery could rupture or explode. The battery temperature must be brought up above freezing point before attempting jump-start.
7. Start the engine in the vehicle that has the booster battery. Let the engine idle a few minutes. Then, start the engine in the vehicle with the discharged battery.
NOTE: For vehicles equipped with ESP, Synchronizing ESP under Electronic Stability Program in Section 5 of this manual if the ESP/BAS light (in the instrument cluster) remains on continuously after start- ing the engine of the vehicle with the discharged battery.
8. When removing the jumper cables, reverse the above sequence exactly. Be careful of the moving belts and fan.
WARNING!
Any procedure other than above could result in:
1. Personal injury caused by electrolyte squirting out the battery vent;
2. Personal injury or property damage due to battery explosion;
3. Damage to charging system of booster vehicle or of immobilized vehicle.
FREEING A STUCK VEHICLE
If your vehicle becomes stuck in mud, sand, or snow, it can often be moved by a rocking motion. Turn your steering wheel right and left to clear the area around the front wheels. Then shift back and forth between Reverse and Drive. Usually the least accelerator pedal pressure to maintain the rocking motion without spinning the wheels is most effective.
NOTE: Turn off the Electronic Stability Program (ESP) — if equipped, or Traction Control System (TCS) — if equipped before rocking the vehicle. For details, “Electronic Stability Program,” or “Traction Control System” in this manual.
CAUTION!
• When “rocking” a stuck vehicle by moving between “First” and R (Reverse), do not spin the wheels faster than 15 mph (24 km/h), or drivetrain damage may result
. • Racing the engine or spinning the wheels too fast may lead to transmission overheating and failure. It can also damage the tires. Do not spin the wheels above 35 mph (55 km/h).
WARNING!
Fast spinning tires can be dangerous. Forces generated by excessive wheel speeds may cause tire damage or failure. A tire could explode and injure someone. Do not spin your vehicle’s wheels faster than 35 mph (55 km/h) when you are stuck, and don’t let anyone near a spinning wheel, no matter what the speed.
TOWING A DISABLED VEHICLE
WITHOUT THE IGNITION KEY
Special care must be taken when the vehicle is towed with the ignition in the LOCK position. The only approved method of towing without the ignition key is with a flat bed truck. Proper towing equipment is necessary to prevent damage to the vehicle.
TOWING THIS VEHICLE BEHIND ANOTHER VEHICLE (Flat towing with all four wheels on the ground)
Flat towing of vehicles equipped with an automatic transmission, is only permitted within the following limitations:
With The Ignition Key
Your vehicle may be towed under the following conditions: The gear selector must be in NEUTRAL, the distance to be traveled must not exceed 30 miles (48 km), and the towing speed must not exceed 30 mph (48
km/h). Exceeding these towing limits may cause a transmission geartrain failure. If the transmission is not operative, or if the vehicle is to be towed more than 30 miles (48 km), the vehicle must be transported using a flat bed truck.
CAUTION!
• Do not attempt to tow this vehicle from the front with sling type towing equipment. Damage to the front fascia will result.
• If the transmission is not operative, or if the vehicle is to be towed more than 30 miles (48 km), then the only approved method of towing is with a flat bed truck. Damage to the transmission may result.
• Do not tow the vehicle from the rear. Damage to the rear sheet metal, and fascia will occur.
• Do not push or tow this vehicle with another vehicle as damage to the bumper fascia and transmission may result.
If you must use the accessories (wipers, defrosters, etc.) while being towed, the key must be in the ON position, not the ACCESSORY position. Make certain the transmission remains in NEUTRAL.
TOWING THIS VEHICLE BEHIND ANOTHER VEHICLE WITH A TOW DOLLY
The manufacture does not recommend that you tow this vehicle on a tow dolly. Vehicle damage may occur.